My course studying art and architecture has led me to look at miniature models. Inspired primarily by Charles Matton, who created models of his own studios and friends’ studios, I decided to make a model of the college art studios. Being influenced by previous craftsmen, the complexity and dynamics of the room, as well as being a room my peers could all relate to, made this room an obvious choice. My original plans were to just create the model out of cardboard and paper, however experimentation and ambition led to using more complex materials like foam board and steel, and time restraints were extended from a week to a few months of obsession. I have enjoyed making this model and throughout the building process I took photos to document my building methods.
The main structure
The main structure includes the walls, floor and fixed objects.
The first thing I had to do was to measure the sizes of the room and the angle of the corners of the room . Once I collected them I had to scale the sizes down. My chosen scale was 1/12th , traditional dolls’ house scale 1 foot equals 1 inch.
The base was made from wood which I cut with a jig saw, I sanded it and then painted the board grey to fit in with the floor of the art room. I had to give the wooden board two or three coats of paint to make sure there was an even coat.
The next part of the structure was the walls which were made out of plastic foam board which had to be cut into nine inch strips from large sheets.
The sizes of the walls were measured and scaled down. I then had to add 6 mm on to make a butt joint with the adjoining wall. Once the final size was calculated it was cut on a circular saw and sanded down.
Walls that had doors or windows in them had to be cut out using a Stanley knife and ruler. The edges were smoothed with sand paper to leave neat, clean edges.
The walls then had to be glued down to the base. Super glue and silicone were used in some places, and screws were needed to strengthen areas further.
The alcove area was a little more complex as I needed to put a curve in the wall. I made 1 inch pieces of wall which were taped aside each other so I could manoeuvre them into a curve, as well as silicone and glue I used P38 filler to fill in the gaps between the strips. Once this was set I could sand the wall smooth.
Shelving and small wall indentations were then glued on to the wall with super glue before masking the floor off and painting the wall white again, this painting took a few attempts to get an even coat especially over areas using silicone.
The last part would be to paint the outside a woody-brown which was the same as the timber clad outside wall.
The chairs
To create the chairs I had to create the metal frame out of steel welding wire. I cut the desired sizes with wire cutters.
The first component to be made was the wire legs which were made by bending the wire in a bending fixture. I put two obtuse angles in to a piece of wire on the same plane. I made two of these for one chair.
The next component is the back bars of the chair. Using a second bending fixture, I made a wire with a u turn in it and bent the component 90 degrees.
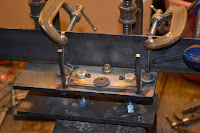
 To join the metal together I put the components in a fixture to hold the pieces together as they were silver soldered together. I then filed the burrs off and flattened them down. After all the metal was buffed up by sand paper to allow me to paint them grey.
 To make the seat and back of the chair, I used foam board this was cut 1.5 inch square 2 are needed for each chair. These are sanded and edges rounded.
The back of the chair is drilled twice through the top of the square another hole is drilled in the centre of the face between the two shafts already drilled.
I sawed down the centre to take out a piece between the shafts. I then sanded the edges and the top corners of the chair are rounded.
 The seat of the chair is made by the other piece of foam board a milling tool allowed me to cut a notch out the back and the opposite side is heavily chamfered.
The foam board is then sanded painted green and then super glued to metal frame.
The Stools
Like the chairs I had to make the stools out of welding wire and foam board and the method was very similar.The first step I had to take was to measure and scale down the dimensions of the chair and cut lengths of wire out.
 Using the bending fixture I put to near right angles on the same plane to make a u shape. One stool would need two of these to create the legs.
The next pieces to make are the 4 bracing rods, two that go und
er the legs and two that butt up against the legs these are cut by saw to keep the ends neat
Another holding fixture was made in which I could solder and file down to size the wire frame. When taken out they could then be sanded and painted grey.
The next piece was the wooden seat. I made this out of 1 inch square foam board. It was sanded down with the edges rounded.
I cut a notch out the middle to resemble the real stools using a milling tool. The centre was also sanded. It was then painted brown and glued to the wire frame to create the stool.
The tables
For the large tables there were three different lengths of square rod needed to be cut 4 legs, 2 widths and 2 lengths. All these lengths were put into a jig that held them all together as they were soldered together.
It was then sanded and painted grey.
A top which was sanded and painted gloss white was then glued to the frame.
The smaller tables have one length that made with curved legs. This is
made with a bending tool and 2 right angles are made on the same plane to form legs. Put back into the table fixture the other steel frame part is cut and soldered on.
Like the larger table a top which was sanded and painted gloss white, was then glued to the frame.
In my model there were a lot of miscellaneous objects in the art room and I tried to recreate most of them in 1/12th scale. These objects included sofas, chairs, Macs, easels and shelves. I tried to mainly use the foam board to make them although I used wood as well, both held together with superglue. Repeat dies and fixtures couldn’t make these as most of these objects were one-offs and would gain me no time.
The pictures on the wall were recreated by photographing them head on and re sizing them on the computer to one-twelfth of the original.
The Finished product
I had great fun making this model and I have acheived all my aims in replicating artists and architects work within the world of minitures


